If you haven’t utilized the free tool from Google called Google Analytics you need to open another browser window and start the process right now. Whether you have build a personal site, have someone else doing it for you, you need to track your site’s impact.
Are you wondering what impact your site has (if any)? How much traffic visits your site? What is the source of that traffic? Does traffic change over time? How do my AdWords campaigns influence my traffic? What are the most popular pages on my site?
If you’ve ever wondered about any of these stats, you can sign up for free to get the answers.
1 – Sign into your Google Account
Go to Google Analytics and sign in using the Google account that should own or manage the website’s Analytics data.
For a business website, it is usually better to use an account controlled by the organisation rather than an employee’s personal email address. This makes it easier to retain access when team members or service providers change.
You can grant additional users access after the property has been created.
2 – Sign up for Google Analytics
After signing in, select the option to begin measuring and enter an account name.
The account is the highest organisational level in Google Analytics. A company may use one Analytics account to manage one or more website or app properties.
Review the available data-sharing settings and choose the options that match the organisation’s requirements.
3 – Set up your Account Properties
Create a new property for the website.
Enter:
- The business or website name
- The reporting time zone
- The preferred reporting currency
- Relevant business information when requested
The time zone is important because it determines how Analytics assigns activity to specific days.
Google’s current setup process creates a Google Analytics 4 property. The older Universal Analytics structure is no longer used for new data collection

The account is your access point for your organization.
The property is the website, mobile app, blog etc., and you can have more than one property in an account (however you are limited to 25 properties in any one account for setup). The way Google does this is by generating a unique tracking code for that property that you (or your developer) adds to your site.
The users are other accounts who will have access to your Analytics properties.
4 – Add the Google Analytics Code to your Website
In order to do this, you (or your webmaster) will have to have access to your sites source code, or have access to a WordPress Plugin (for wordpress sites) that will automatically add it to your site.
Find the tracking code for your property.
Once you are signed into your account, click Admin in the top menu bar. From the Account and Property columns, select the property you’re working with. Click Tracking Info / Tracking Code.
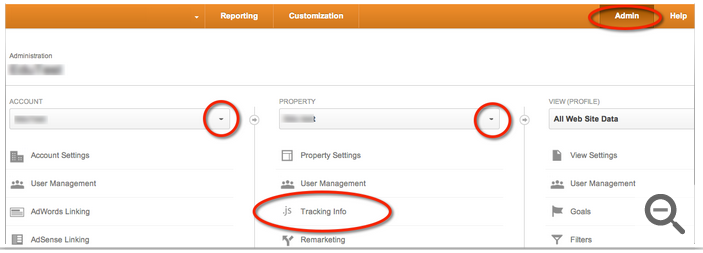
- You should see a box with several lines of code. Everything in this box is your tracking code snippet. It starts with
<script>and ends with</script>. The tracking code contains a unique ID that corresponds to each Google Analytics property. Don’t reuse this tracking code on multiple domains. Generate a new one for each property. - Copy the entire code, but do not modify it. Copy from before
<script>and end after</script>. - Paste your code snippet (unaltered, in it’s entirety) into every web page you want to track. Paste it immediately before the closing
</head>tag.
- Check your set up. Make sure that the tracking code installed on your website matches the code shown in the view. There are several other ways to verify your set up.
And that’s it! You’re good to start tracking your visitors, seeing where they go on your site, and how long they’ve viewed all that wonderful content you’ve been producing.
Start Measuring Your Website Performance
Once Google Analytics tracking is installed and verified, you can begin evaluating how visitors discover and interact with your website.
However, collecting data is only the first step. The information should be reviewed regularly and connected to practical marketing goals, such as improving high-traffic pages, generating qualified leads and increasing conversions.
Need help setting up GA4 or understanding your website data? Contact AOK Marketing for support with Google Analytics, digital measurement and performance-focused marketing strategy.
Frequently Asked Questions
Is Google Analytics tracking code the same as a Measurement ID?
No. The Measurement ID identifies a particular GA4 web data stream and normally begins with G-. The Google tag is the full code or tag configuration that uses that ID to send information from the website to Analytics.
Where do I find my GA4 Measurement ID?
Open the relevant property and go to:
Admin → Data streams → select your web stream
The Measurement ID appears in the web-stream details.
Can I install GA4 on WordPress without editing code?
Yes. WordPress users can normally install it through a supported plugin, integration or Google Tag Manager without manually changing each page.
How long does Google Analytics take to show data?
Realtime information may begin appearing within several minutes, while other reports can require up to 24–48 hours to process.
Do I need a separate GA4 property for every website?
Separate properties are often useful when websites represent different businesses, audiences or reporting requirements. The correct structure depends on how the organisation needs to manage access and analyse data.
Happy Marketing!
Dave Burnett
Click Here to Connect with Dave on Google+: www.google.com/+DaveBurnett
About The Author